Showing posts with label Windows XP. Show all posts

Sunday, July 17, 2016

Windows 7 Classic Logon


Do not like to display last username in Logon Screen?
Use this trick to use Windows 7 Classic Logon, its like the Classic Windows XP Logon.


1. Open the Registry Editor, Start> Run type regedit
2. Go to HKEY_LOCAL_MACHINE\SOFTWARE\Microsoft\Windows\CurrentVersion\Policies\System
3. Find dontdisplaylastusername at the right pane, double click and change to value to 1.
4. Hit OK button, That's it!!

Friday, June 4, 2010

How to Install IIS on Windows Vista, Windows XP and Windows 2000


Follow these steps to install IIS on Windows Vista:
Internet Information Services (IIS)

1.Open the Control Panel from the Start menu
2.Double-click Programs and Features
3.Click "Turn Windows features on or off" (a link to the left)
4.Select the check box for Internet Information Services (IIS), and click OK
After you have installed IIS, make sure you install all patches for bugs and security problems. (Run Windows Update).


Follow these steps to install IIS on Windows XP and Windows 2000:

1.On the Start menu, click Settings and select Control Panel
2.Double-click Add or Remove Programs
3.Click Add/Remove Windows Components
4.Click Internet Information Services (IIS)
5.Click Details
6.Select the check box for World Wide Web Service, and click OK
7.In Windows Component selection, click Next to install IIS
After you have installed IIS, make sure you install all patches for bugs and security problems. (Run Windows Update).

Test Your Web
After you have installed IIS, follow these steps:

1.Look for a new folder called Inetpub on your hard drive
2.Open the Inetpub folder, and find a folder named wwwroot
3.Create a new folder, like "MyWeb", under wwwroot
4.Write some ASP code and save the file as "test1.asp" in the new folder
5.Make sure your Web server is running (see below)
6.Open your browser and type "http://localhost/MyWeb/test1.asp", to view your first web page
Note: Look for the IIS (or PWS) symbol in your start menu or task bar. The program has functions for starting and stopping the web server, disable and enable ASP, and much more.

Friday, May 21, 2010

File Sharing between Windows 7 and XP


Sharing folders between two Windows 7 machines with the new HomeGroup feature is an easy process, but the HomeGroup feature is not compatible with Vista or XP. For this tutorial we are using Windows 7 x64 RC1 and XP Professional SP3 connected through a basic Linksys home wireless router.

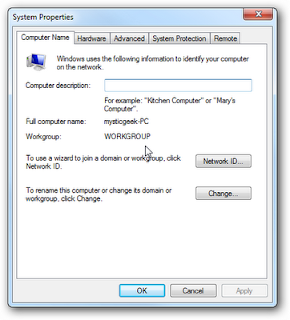
First make sure both machines are members of the same Workgroup which by default is named Workgroup.


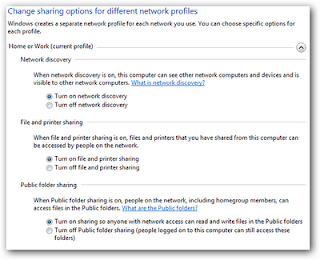
On the Windows 7 machine go into Control Panel \ All Control Panel Items \ Network and Sharing Center then click on Change advanced sharing settings.


You will want to verify the following settings under Advanced Sharing Settings for the Home or Work and Public profile


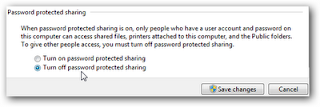
If you want any user to have access the public shares turn off password protection. This is located in Advanced Sharing Settings toward the bottom of the list.

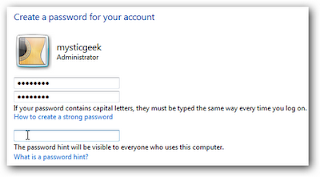
If you want to keep it enabled make sure there is a log in account for the other XP machines and they have a password.

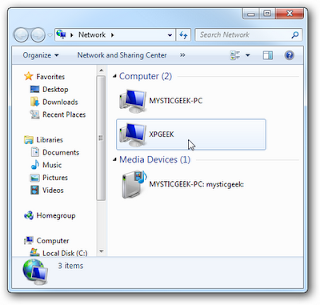
Now if you go into Network in Windows 7 you should see your XP machine and the Windows 7 as well which in this case is Mysticgeek-PC.


That's it.

Friday, May 14, 2010

Installing Japanese Keyboards on Windows XP


Instruction for Windows XP with Service Pack 2.
  1. Navigate to Start > Control Panel > Keyboard
  2. On the Hardware tab, click Properties (note that the current driver is probably "Standard 101/102-Key or Microsoft Natural PS/2 Keyboard")
  3. On the Driver tab, click Update Driver...
  4. The Hardware Update Wizard launches. When it asks if Windows can connect to Windows Update to search for software, select "No, not this time" and click Next
  5. Select "Install from a list or specific location (Advanced)" and click Next
  6. Select "Don't search. I will choose the driver to install" and click Next
  7. Uncheck "Show compatible hardware"
  8. Select "Japanese PS/2 Keyboard (106/109 Key)" from the manufacturer "(Standard keyboards)" and click Next
  9. Click Yes to continue with the installation when the warning about installing incompatible device drivers appears
  10. Click Yes to continue with the installation when the warning about replacing PS/2 mouse port drivers appears
  11. Click Finish and reboot


Instruction for Windows XP Pro

This assumes you are using a PS/2 Keyboard and Mouse. Other types will have to make a different selection from the list of standard keyboards.
  1. Go to Control Panel->Printers and Other Hardware->Keyboards
  2. Click on the "Hardware" tab and the keyboard connected to the system will show.
  3. Click on the "Properties" button and another window displays the keyboard properties
  4. Click on the "Driver" tab
  5. Click on the "Update Driver" button on the Driver screen
  6. The "Update Driver Wizard" will run.
  7. Click the "Install From a Specific Location" button (NOT AUTOMATIC) and the "Next" button.
  8. Click the "Don't seach. I will choose the driver to install" option and the "Next" button.
  9. On the next screen, uncheck the "Show compatible hardware" checkbox and choose the Japanese PS/2 Keyboard (106/109 Key) from the list of "(Standard keyboards)".
  10. Ignore warnings and reboot.