Friday, May 28, 2010

Add a Slideshow of Picasa Photos to Your Blog


Picasa is a free photo management product by Google that I actually use for all my photos. The software organizes and can adjust your photo albums on your computer and then easily uploads them to your Picasa account. I love the ability to quickly upload pictures from my trips, etc and just send the url to my friends and family.

So if you already have a Picasa account and have pictures you’d like to include on your blog, you should check out this widget. If you don’t have Picasa yet, I highly recommend you download it for free by clicking on the link below.

After you select the photo album and settings you want to use, it gives you some code to paste into your site. You can either paste it into your post or add it to your sidebar by creating an html/javascript widget. Then just paste the code into the widget and save.

Here’s a screenshot of the widget being setup:

Notice how easy the setup process is. It provides the code to paste into your blog and then you’ll have a flash slideshow rotating through all your photos! Pretty cool. I was going to include a working demo but once you login to your account and start building a slideshow, it shows you real-time how it works. It’s worth checking out….enjoy!

Friday, May 21, 2010

File Sharing between Windows 7 and XP


Sharing folders between two Windows 7 machines with the new HomeGroup feature is an easy process, but the HomeGroup feature is not compatible with Vista or XP. For this tutorial we are using Windows 7 x64 RC1 and XP Professional SP3 connected through a basic Linksys home wireless router.

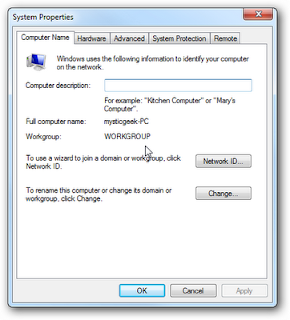
First make sure both machines are members of the same Workgroup which by default is named Workgroup.


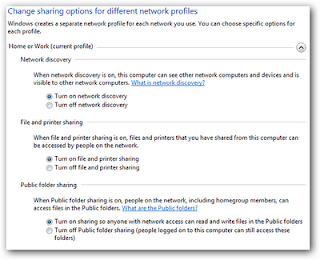
On the Windows 7 machine go into Control Panel \ All Control Panel Items \ Network and Sharing Center then click on Change advanced sharing settings.


You will want to verify the following settings under Advanced Sharing Settings for the Home or Work and Public profile


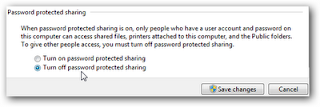
If you want any user to have access the public shares turn off password protection. This is located in Advanced Sharing Settings toward the bottom of the list.

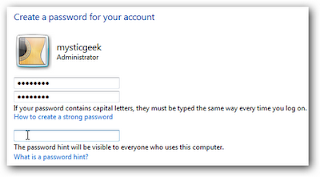
If you want to keep it enabled make sure there is a log in account for the other XP machines and they have a password.

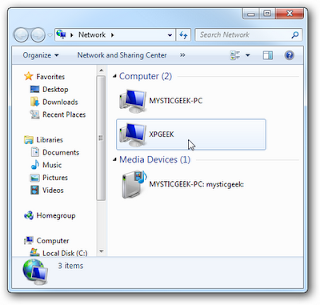
Now if you go into Network in Windows 7 you should see your XP machine and the Windows 7 as well which in this case is Mysticgeek-PC.


That's it.

Friday, May 14, 2010

Installing Japanese Keyboards on Windows XP


Instruction for Windows XP with Service Pack 2.
  1. Navigate to Start > Control Panel > Keyboard
  2. On the Hardware tab, click Properties (note that the current driver is probably "Standard 101/102-Key or Microsoft Natural PS/2 Keyboard")
  3. On the Driver tab, click Update Driver...
  4. The Hardware Update Wizard launches. When it asks if Windows can connect to Windows Update to search for software, select "No, not this time" and click Next
  5. Select "Install from a list or specific location (Advanced)" and click Next
  6. Select "Don't search. I will choose the driver to install" and click Next
  7. Uncheck "Show compatible hardware"
  8. Select "Japanese PS/2 Keyboard (106/109 Key)" from the manufacturer "(Standard keyboards)" and click Next
  9. Click Yes to continue with the installation when the warning about installing incompatible device drivers appears
  10. Click Yes to continue with the installation when the warning about replacing PS/2 mouse port drivers appears
  11. Click Finish and reboot


Instruction for Windows XP Pro

This assumes you are using a PS/2 Keyboard and Mouse. Other types will have to make a different selection from the list of standard keyboards.
  1. Go to Control Panel->Printers and Other Hardware->Keyboards
  2. Click on the "Hardware" tab and the keyboard connected to the system will show.
  3. Click on the "Properties" button and another window displays the keyboard properties
  4. Click on the "Driver" tab
  5. Click on the "Update Driver" button on the Driver screen
  6. The "Update Driver Wizard" will run.
  7. Click the "Install From a Specific Location" button (NOT AUTOMATIC) and the "Next" button.
  8. Click the "Don't seach. I will choose the driver to install" option and the "Next" button.
  9. On the next screen, uncheck the "Show compatible hardware" checkbox and choose the Japanese PS/2 Keyboard (106/109 Key) from the list of "(Standard keyboards)".
  10. Ignore warnings and reboot.

Monday, May 10, 2010

Installing Japanese Keyboards on Windows 2000


Please fallow the following steps carefully.
  1. Control Panel, Regional Options
  2. General tab, under Language settings for the system
  3. Tick Japanese, set it as default if you want to run native Japanese apps (eg Office 97/98). It sets code page 932 as the default -- this may break other things if you are not careful!
  4. Insert Windows CD, reboot, etc.
  5. Control Panel, System
  6. Hardware tab, Device Manager
  7. Find your keyboard device (probably says PC/AT Enhanced PS/2 Keyboard)
  8. Double click to bring up the properties
  9. Driver tab, Update Driver
  10. Next, then Display a list of known drivers
  11. Show all hardware of this device class
  12. Manufacturer: (Standard keyboards), Device: Japanese PS/2 Keyboard (106/109 key)
  13. Ignore the warning and hit yes
  14. Install the driver, reboot, etc etc ...
  15. Control Panel, Regional Options
  16. Input Locales tab, click Add
  17. If you want to use Japanese: Language=Japanese Keyboard layout=Japanese Input System MS-IME2000
  18. If you want to use another language: Language=your language layout=Japanese
  19. Or do both and switch between them.

So perhaps it as not quite as simple, having written down the steps. Caveats: I don't know what happens if you use a USB keyboard instead of a PS/2-AT one. There is also only one layout under W2K, as opposed to several under NT.

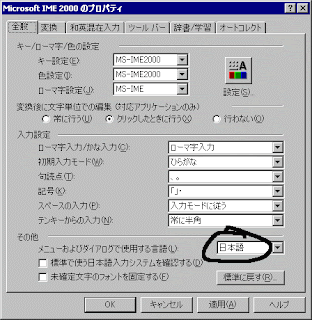
You can change the user interface language of IME 2000 between Japanese and English. Go into the IME properties box and it's on the first screen. The usefulness of this is debatable, but hey.


]